
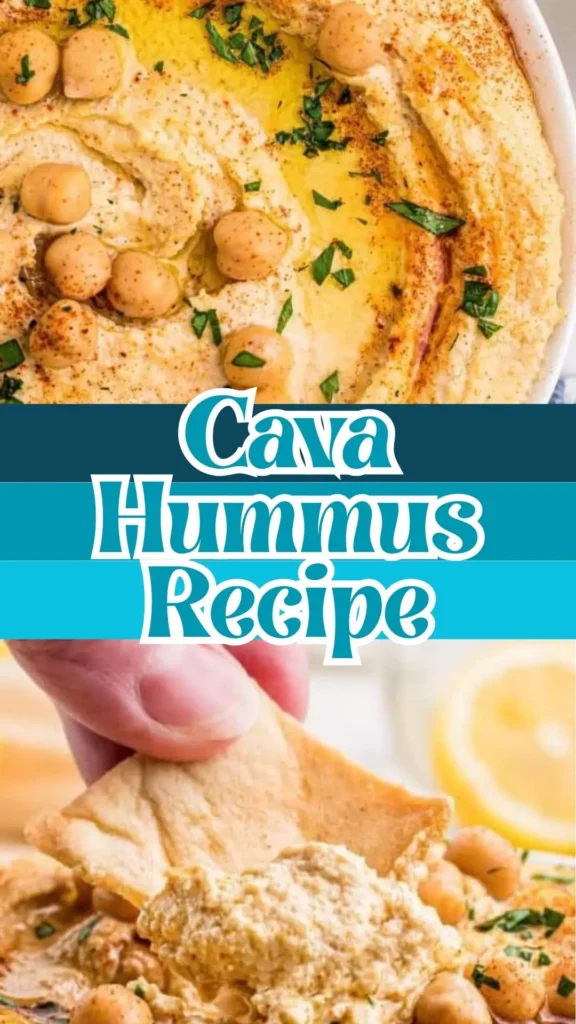
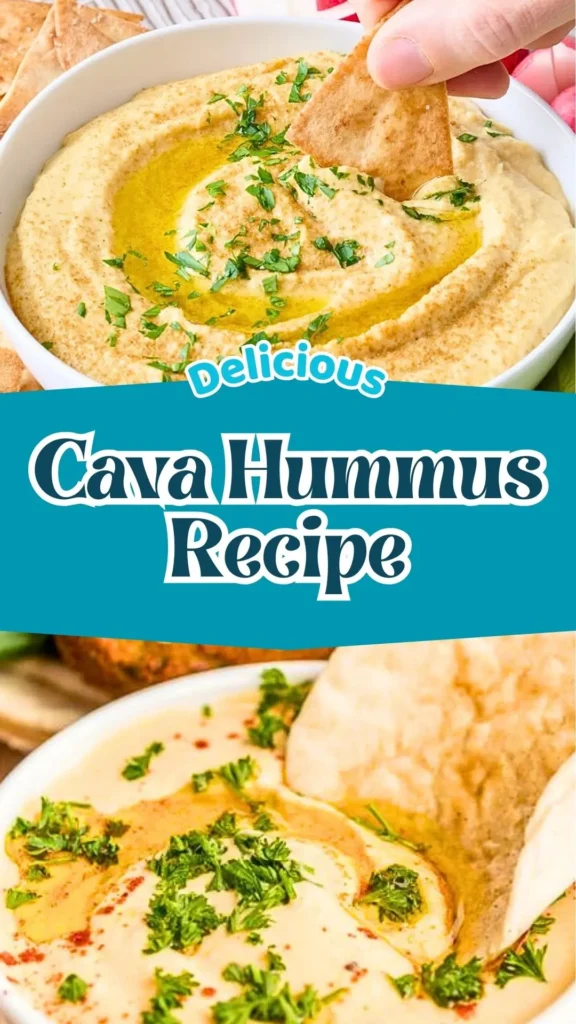
Silky-smooth, garlicky Cava hummus has earned its place as a Mediterranean fast-casual favorite thanks to its cloud-like texture and perfectly balanced flavor.
This copycat Cava hummus recipe brings that crave-worthy experience into your home kitchen using time-tested, traditional techniques.
A truly authentic homemade hummus recipe starts with soaking dried chickpeas, roasting garlic in olive oil, and removing chickpea skins to achieve an ultra-creamy consistency.
Designed for hummus purists and casual fans alike, this best hummus recipe delivers restaurant-quality results with simple, wholesome ingredients and unmistakable Cava-inspired flavor.
What Does Cava Hummus Taste Like?
This garlic hummus recipe strikes a perfect balance between nutty, tangy, and savory notes. The tahini brings earthy richness while fresh lemon juice adds bright acidity that wakes up your palate.
Roasted garlic infuses the hummus with sweet, mellow depth rather than sharp bite. The texture is impossibly smooth and creamy almost whipped with a luxurious mouthfeel that coats your palate. Each bite finishes with a subtle nuttiness from the chickpeas and a whisper of warmth from cayenne pepper.
It’s lighter and more refined than store-bought varieties, with a clean, fresh taste that makes you reach for just one more scoop.
Cava Hummus Recipe Ingredients You’ll Need
For Soaking and Cooking the Chickpeas
- 2 cups dried garbanzo beans (chickpeas)
- Water for soaking and cooking
- ½ teaspoon baking soda
For Roasted Garlic and Infused Oil
- 8-10 garlic cloves, peeled
- 1 cup extra virgin olive oil
For the Hummus Base
- ½ cup tahini (sesame seed paste)
- ¼ cup fresh lemon juice (about 2 lemons)
- 1½ teaspoons sea salt (adjust to taste)
- 6-8 roasted garlic cloves
- ¼-½ cup roasted garlic olive oil
For Serving and Garnish
- 2 tablespoons extra virgin olive oil
- ¼ teaspoon cayenne pepper (or paprika)
- 2 tablespoons fresh chopped parsley
Kitchen Utensils and Equipment
- Large glass jar or container (for soaking)
- Large cooking pot
- Medium saucepan
- Food processor
- Measuring cups and spoons
- Fine-mesh strainer
- Serving plate or shallow bowl
- Spoon for mixing and serving
Preparation and Cooking Time
- Soaking time: 8 hours (or overnight)
- Prep time: 15 minutes
- Cooking time: 1 hour
- Total active time: 1 hour 15 minutes
- Servings: 6-8 servings (about 3 cups)
Cava Hummus Recipe Instructions
Step 1: Soak the Chickpeas
Place 2 cups dried garbanzo beans in a large container or half-gallon jar. Cover completely with water, ensuring at least 4 inches of water sits above the beans. Cover the container and let soak overnight or for at least 8 hours at room temperature.

The chickpeas will double in size.
Step 2: Prepare Chickpeas for Cooking
After soaking, drain the water completely and rinse the beans thoroughly under cold running water. Sort through them carefully, removing any discolored or damaged beans. Transfer to a large pot.
Step 3: Cook the Chickpeas
Cover the chickpeas with fresh water, about 2 inches above the beans. Add ½ teaspoon baking soda to help soften the skins. Bring to a rolling boil over high heat, then reduce to a gentle simmer. Cook for 30-40 minutes until the chickpeas are very tender and easily mash between your fingers.
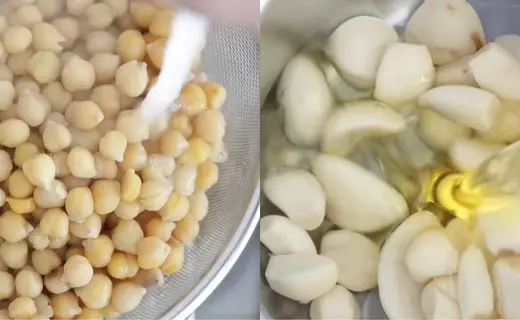
Step 4: Roast the Garlic
While the chickpeas simmer, place 8-10 peeled garlic cloves in a medium saucepan. Cover completely with extra virgin olive oil (about 1 cup). Cook over low heat for 25-30 minutes, checking after 15-20 minutes. The garlic should turn golden brown and become butter-soft. Remove from heat and let cool, reserving the garlic-infused oil.
Step 5: Remove Chickpea Skins (Optional but Recommended)
Drain and rinse the cooked chickpeas. For ultra-creamy hummus, return them to the pot and cover with cold water. Gently rub the chickpeas between your hands to loosen the skins they’ll float to the surface. Scoop out and discard the skins. Drain the chickpeas thoroughly.
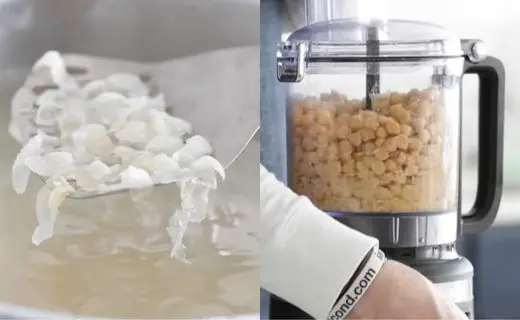
Step 6: Blend to Paste
Add the drained chickpeas to your food processor. Pulse on high speed for 1-1.5 minutes until a thick, grainy paste forms. Stop and scrape down the sides as needed.
Step 7: Add Flavoring Ingredients
Add ½ cup tahini, ¼ cup fresh lemon juice, 6-8 roasted garlic cloves, and 1½ teaspoons sea salt to the chickpea paste.

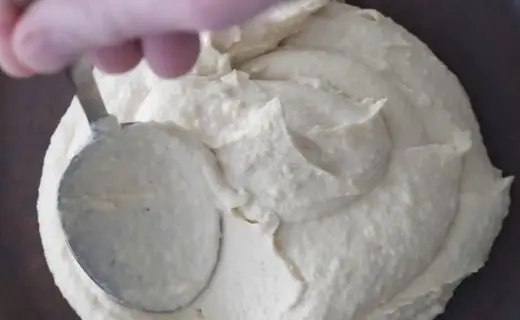
Step 8: Create the Creamy Texture
Process on low speed while slowly drizzling in ¼-½ cup of the roasted garlic olive oil through the feed tube. Continue processing for 2-3 minutes until the hummus becomes silky smooth and creamy. Taste and adjust seasoning with more lemon juice, tahini, or salt as desired.
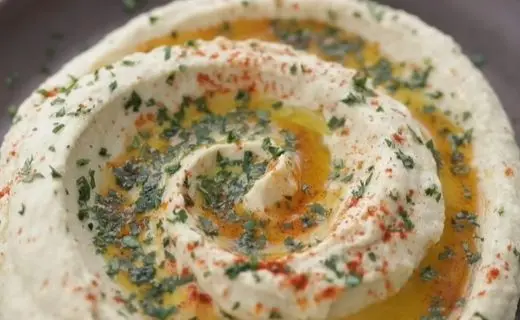
Step 9: Plate and Garnish
Transfer the hummus to a shallow serving plate or bowl. Use the back of a spoon to create a spiral groove or well in the center. Drizzle generously with extra virgin olive oil, sprinkle with cayenne pepper or paprika, and scatter fresh chopped parsley on top.
Step 10: Serve
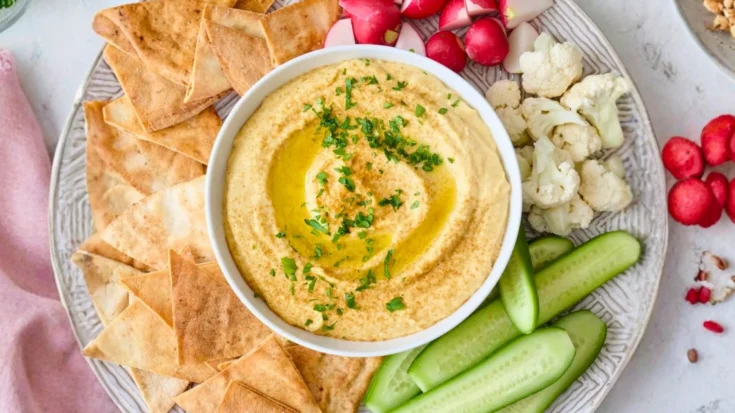
Serve immediately with warm pita bread, fresh vegetables, or use as a creamy spread for sandwiches and wraps.
Customization and Pairing Ideas for Serving
1. Spicy Harissa Hummus
Swirl 2-3 tablespoons of harissa paste into your finished hummus for a North African-inspired kick. The smoky, spicy notes complement the creamy chickpeas beautifully. Top with a drizzle of harissa oil and serve with grilled vegetables for an elevated appetizer.
2. Roasted Red Pepper Variation
Blend in one roasted red pepper (jarred or homemade) during the final processing stage. This adds natural sweetness and a vibrant coral color. Garnish with toasted pine nuts and serve alongside grilled lamb kebabs or shawarma.
3. Mediterranean Mezze Platter
Create an impressive spread by surrounding your easy hummus recipe with marinated olives, stuffed grape leaves, feta cheese, cucumber slices, cherry tomatoes, and warm pita triangles. Add some pickled turnips and radishes for authentic Middle Eastern flair.
4. Herb-Infused Version
Pulse in fresh herbs like cilantro, dill, or mint during the final blend for a green goddess-style hummus. This herbaceous variation pairs wonderfully with grilled fish, falafel wraps, or as a fresh spring dip with crudités.
5. Breakfast Bowl Base
Use this hummus recipe with tahini as a savory breakfast bowl foundation. Top with a soft-boiled egg, za’atar seasoning, cherry tomatoes, and a drizzle of hot sauce. Add some toasted whole grain bread for dipping.
6. Protein-Packed Lunch Bowl
Build a nourishing lunch bowl with hummus as the creamy base, topped with quinoa, roasted chickpeas, cucumber, red onion, kalamata olives, and grilled chicken. Drizzle with lemon-tahini dressing for a complete meal.
7. Sandwich Spread Upgrade
Replace mayonnaise with this garlic hummus recipe in your favorite sandwiches and wraps. It adds protein, fiber, and incredible flavor to turkey clubs, veggie wraps, or grilled chicken sandwiches while keeping things lighter and more nutritious.
Expert Tips for Perfect Hummus
1. Don’t Skip the Overnight Soak
While you can quick-soak chickpeas with boiling water for 1 hour, the traditional overnight soak yields better results. Properly soaked chickpeas cook more evenly and break down more smoothly in the food processor, giving you that signature Cava creaminess. The long soak also makes chickpeas easier to digest.
2. The Baking Soda Secret
Adding baking soda to your cooking water isn’t just a suggestion it’s transformative. This alkaline ingredient breaks down the chickpea skins and softens the beans more thoroughly. Use about ½ teaspoon per pot, but don’t exceed this amount or your chickpeas may become mushy and lose their subtle nutty flavor.
3. Roasted vs. Raw Garlic Makes All the Difference
Raw garlic creates harsh, biting hummus that overpowers the other flavors. Roasting garlic cloves slowly in olive oil transforms them into sweet, buttery gems that melt seamlessly into your hummus. The infused oil also becomes a flavor-packed ingredient that does double duty in the recipe. Save any extra roasted garlic oil for salad dressings or pasta dishes.
4. Master the Tahini-Lemon Balance
Quality tahini is non-negotiable for authentic hummus. Look for well-stirred, runny tahini rather than separated, thick paste. Start with equal parts tahini and lemon juice, then adjust to your preference. If your hummus tastes flat, add more lemon. If it’s too tangy, add more tahini. This balance creates the foundation of flavor in your best hummus recipe.
5. Blend in Stages for Silky Texture
The key to restaurant-quality texture is patience. First, blend chickpeas alone until they form a thick paste. This breaks down the beans completely. Then add tahini, lemon, and garlic. Finally, drizzle in oil while processing. This staged approach prevents the mixture from seizing up and ensures even incorporation of all ingredients.
6. Temperature Matters
Use room temperature chickpeas and tahini for the smoothest results. Cold ingredients don’t emulsify as well and can result in grainy hummus. If your chickpeas are refrigerated, let them sit out for 20-30 minutes before blending. Warm hummus also blends more easily than cold.
7. Adjust Consistency with Reserved Liquids
If your homemade hummus recipe turns out too thick, thin it with small amounts of the reserved chickpea cooking liquid (aquafaba), ice water, or more olive oil. Add just a tablespoon at a time while processing until you reach your desired consistency. The hummus will thicken slightly as it sits, so err on the side of slightly looser.
Storage and Reheating Guidance
Store your copycat Cava hummus in an airtight container in the refrigerator for up to 5-7 days. Pour a thin layer of olive oil over the surface to prevent drying and oxidation. Before serving, let it sit at room temperature for 15-20 minutes and stir well to restore creaminess.
Common Queries and FAQs
Here, we’ve got you covered with some common questions about the Cava Hummus Recipe that people often ask.
Can I use canned chickpeas instead of dried beans?
Yes, you can use canned chickpeas for a quicker version. Use three 15-ounce cans, drained and rinsed thoroughly. You’ll still want to remove the skins by rubbing them gently in cold water for the creamiest texture. The flavor won’t be quite as deep as when using dried chickpeas, but it’s a convenient weeknight option that still produces excellent hummus.
Why is my hummus grainy instead of smooth?
Grainy hummus usually results from under-blending or not removing the chickpea skins. Process the mixture longer at least 3-4 minutes total and make sure you’re adding enough liquid (oil or aquafaba) while blending. If you skipped the skin-removal step, this also contributes to graininess. For ultra-smooth results, consider passing the hummus through a fine-mesh strainer after blending.
What if I don’t have tahini?
While tahini is essential to authentic hummus flavor, you can substitute with sunflower seed butter or cashew butter in a pinch. The taste will differ significantly, becoming less nutty and traditional. Another option is to make quick tahini by blending ½ cup sesame seeds with 2-3 tablespoons neutral oil until smooth.
How do I make my hummus less bitter?
Bitterness usually comes from poor-quality or rancid tahini. Always taste your tahini before adding it to hummus. If it’s bitter, try a different brand look for fresh, well-stirred tahini from Middle Eastern markets. Over-processing can also create bitterness by heating up the mixture and releasing bitter compounds. Blend just until smooth, then stop.
Can I freeze homemade hummus?
Absolutely! This easy hummus recipe freezes beautifully for up to 4 months. Store in freezer-safe containers, leaving ½ inch of headspace for expansion. Thaw overnight in the refrigerator, then let it come to room temperature. Stir vigorously or re-blend briefly with a splash of olive oil to restore the creamy texture. The flavor remains intact, though the texture may be slightly less silky than fresh.
Why does restaurant hummus taste better than mine?
Restaurants often have a few secrets: they use very fresh chickpeas, blend for longer periods in high-powered equipment, and aren’t shy with high-quality olive oil and tahini. They also typically remove chickpea skins religiously and serve hummus at room temperature, never cold. Following this recipe’s technique of roasting garlic in oil and proper blending stages will get you remarkably close to that professional taste.
What’s the best way to serve hummus for a party?
For entertaining, spread hummus on a large, shallow platter rather than serving it in a bowl. This creates more surface area for toppings and makes it easier for guests to scoop. Create a well in the center using the back of a spoon, then drizzle generously with your best olive oil. Add visual interest with toppings like whole chickpeas, pine nuts, sumac, za’atar, or pomegranate seeds. Arrange fresh vegetables, pita chips, and warm pita bread around the platter.
How can I make my hummus more garlicky?
While this recipe uses roasted garlic for mellow sweetness, you can add 1-2 raw garlic cloves for more punch. Add raw garlic during the blending stage, but be cautious raw garlic intensifies as hummus sits. Start with one small clove, taste, and add more if needed. For the best of both worlds, use mostly roasted garlic with one small raw clove for bite.
Is hummus healthy?
Yes! This hummus recipe with tahini is packed with plant-based protein, fiber, healthy fats, and minerals like iron and folate. Chickpeas provide complex carbohydrates that keep you satisfied, while tahini delivers calcium and heart-healthy monounsaturated fats. A ¼-cup serving contains approximately 100-140 calories, 5-6g protein, and 5-7g fiber. It’s naturally vegan, gluten-free, and suitable for most dietary preferences.
What type of tahini should I buy?
Look for tahini made from 100% ground sesame seeds with no added oils or preservatives. Middle Eastern brands like Soom, Al Wadi, or Seed + Mill are excellent choices. The tahini should be smooth and pourable when well-stirred, not thick and pasty. Store opened tahini in the refrigerator and always stir thoroughly before using, as the oil naturally separates. Fresh tahini has a mild, nutty flavor without any bitterness.
Cava Hummus Recipe
Silky-smooth, garlicky Cava hummus has earned its place as a Mediterranean fast-casual favorite thanks to its cloud-like texture and perfectly balanced flavor. This copycat Cava hummus recipe brings that crave-worthy experience into your home kitchen using time-tested, traditional techniques. A truly authentic homemade hummus recipe starts with soaking dried chickpeas, roasting garlic in olive oil, and removing chickpea skins to achieve an ultra-creamy consistency.
Ingredients
- 2 cups dried garbanzo beans (chickpeas)
- Water for soaking and cooking
- ½ teaspoon baking soda
- 8-10 garlic cloves, peeled
- 1 cup extra virgin olive oil
- ½ cup tahini (sesame seed paste)
- ¼ cup fresh lemon juice (about 2 lemons)
- 1½ teaspoons sea salt (adjust to taste)
- 6-8 roasted garlic cloves
- ¼-½ cup roasted garlic olive oil
- 2 tablespoons extra virgin olive oil
- ¼ teaspoon cayenne pepper (or paprika)
- 2 tablespoons fresh chopped parsley
Instructions
Step 1: Soak the Chickpeas
Place 2 cups dried garbanzo beans in a large container or half-gallon jar. Cover completely with water, ensuring at least 4 inches of water sits above the beans. Cover the container and let soak overnight or for at least 8 hours at room temperature. The chickpeas will double in size.
Step 2: Prepare Chickpeas for Cooking
After soaking, drain the water completely and rinse the beans thoroughly under cold running water. Sort through them carefully, removing any discolored or damaged beans. Transfer to a large pot.
Step 3: Cook the Chickpeas
Cover the chickpeas with fresh water, about 2 inches above the beans. Add ½ teaspoon baking soda to help soften the skins. Bring to a rolling boil over high heat, then reduce to a gentle simmer. Cook for 30-40 minutes until the chickpeas are very tender and easily mash between your fingers.
Step 4: Roast the Garlic
While the chickpeas simmer, place 8-10 peeled garlic cloves in a medium saucepan. Cover completely with extra virgin olive oil (about 1 cup). Cook over low heat for 25-30 minutes, checking after 15-20 minutes. The garlic should turn golden brown and become butter-soft. Remove from heat and let cool, reserving the garlic-infused oil.\
Step 5: Remove Chickpea Skins (Optional but Recommended)
Drain and rinse the cooked chickpeas. For ultra-creamy hummus, return them to the pot and cover with cold water. Gently rub the chickpeas between your hands to loosen the skins they’ll float to the surface. Scoop out and discard the skins. Drain the chickpeas thoroughly.
Step 6: Blend to Paste
Add the drained chickpeas to your food processor. Pulse on high speed for 1-1.5 minutes until a thick, grainy paste forms. Stop and scrape down the sides as needed.
Step 7: Add Flavoring Ingredients
Add ½ cup tahini, ¼ cup fresh lemon juice, 6-8 roasted garlic cloves, and 1½ teaspoons sea salt to the chickpea paste.
Step 8: Create the Creamy Texture
Process on low speed while slowly drizzling in ¼-½ cup of the roasted garlic olive oil through the feed tube. Continue processing for 2-3 minutes until the hummus becomes silky smooth and creamy. Taste and adjust seasoning with more lemon juice, tahini, or salt as desired.
Step 9: Plate and Garnish
Transfer the hummus to a shallow serving plate or bowl. Use the back of a spoon to create a spiral groove or well in the center. Drizzle generously with extra virgin olive oil, sprinkle with cayenne pepper or paprika, and scatter fresh chopped parsley on top.
Step 10: Serve
Serve immediately with warm pita bread, fresh vegetables, or use as a creamy spread for sandwiches and wraps.
Notes
Store your copycat Cava hummus in an airtight container in the refrigerator for up to 5-7 days. Pour a thin layer of olive oil over the surface to prevent drying and oxidation. Before serving, let it sit at room temperature for 15-20 minutes and stir well to restore creaminess.
Nutrition Information:
Yield:
4Serving Size:
1Amount Per Serving: Calories: 120
This copycat Cava hummus recipe proves that restaurant-quality hummus is absolutely achievable at home. By taking time to properly soak and cook your chickpeas, roast garlic slowly in olive oil, and blend patiently, you’ll create hummus that rivals your favorite Mediterranean spot.
The beauty of this best hummus recipe lies in its versatility enjoy it as a dip, spread, or bowl base throughout your week. Once you taste the difference that fresh ingredients and traditional techniques make, you’ll never go back to store-bought. Now grab your food processor and get blending!
If you enjoyed this recipe, be sure to save it and share it with friends. Don’t forget to follow us on Pinterest and YouTube for more cozy and comfort recipes.